Is There an Automatic Paper Feed for the Hp Envy 5540
Z7_3054ICK0KGTE30AQO5O3KA30N0
hp-concentra-wrapper-portlet
![]() Actions
Actions
HP ENVY 5540, DeskJet 5570 Printers - Loading Paper, Envelopes, and Cards
This document is for HP DeskJet Ink Advantage 5575, ENVY 5540, 5541, 5542, 5543, 5544, 5545, 5546, 5547, 5548, and 5549 All-in-One printers.
This document provides instructions for loading plain paper, photo paper, cards, and envelopes into the printer. Load plain paper, photo paper, envelopes, and index cards in the main input tray. Load 10.16 x 15.24 cm (4 x 6 in) photo paper in the photo tray.
caution:To avoid printing issues, never load multiple types of paper in the input tray or attempt to load paper while the printer is printing.
Load plain paper
Load plain paper, such as A4 or U.S. letter, into the input tray for basic printing.
Also use these instructions to load 127 x 177 mm (5 x 7 in), 203 x 254 mm (8 x 10 in), or 216 x 279 mm (8.5 x 11 in) photo paper.
-
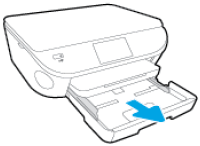
Grasp the handle on the bottom of the input tray, then pull the tray toward you to open it.
The Close Tray screen displays on the printer control panel with the message, A paper tray is open. Make sure the paper you want to use is loaded, and then close the tray to continue.
Figure : Pulling out the input tray
-
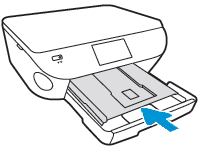
With the input tray pulled out, push in the photo tray as far as possible.
Figure : Pushing in the photo tray
-
Remove any paper from the input tray, then slide out the paper width guides as far as possible.
Figure : Sliding out the paper width guides

-
Insert a small stack of paper into the tray. Make sure the print side is face-down with the short edge forward.
Figure : Loading paper in the input tray
-
Push the paper toward the rear of the input tray until the paper stops, then gently slide the paper width guides inward so they lightly rest against the edges of the paper.
Do not push in the paper width guides so far that they bind the paper.
Figure : Sliding in the paper width guides

-
Make sure the stack of paper is not higher than the top edges of the paper width guides.
-
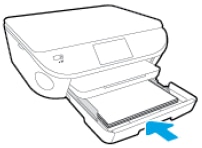
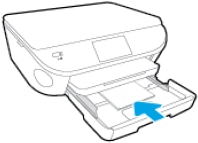
Push the input tray into the printer until it locks into place.
Figure : Pushing in the paper tray
-
The Did You Change the Paper? screen displays. If you do not touch an option, the message fades after several seconds, and the printer uses the most recent paper settings. If necessary, adjust the paper settings as needed:
-
If you did not change the paper size or type, touch OK to return to the Home screen, or wait several seconds to allow the printer to automatically return to the Home screen.
-
If you did change the paper size or type, touch Main Tray, touch Paper Size, then touch your paper size. Touch Paper Type, then touch your paper type. Touch Done, then touch OK to return to the Home screen.
-
Load photo paper in the photo paper tray
The photo tray supports 10.16 x 15.24 cm (4x6 in) photo paper only. You can print other sizes of photo paper from the main input tray by following the instructions for loading plain paper.
-
Grasp the handle on the bottom of the input tray, then pull the tray toward you to open it.
The Close Tray screen displays on the printer control panel with the message, A paper tray is open. Make sure the paper you want to use is loaded, and then close the tray to continue.
Figure : Pulling out the input tray
-
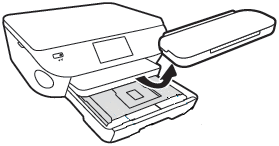
Put one or two fingers in the slot on the photo tray, then pull the tray toward you as far as possible.
note:
If you do not see the photo tray inside the input tray, remove the output tray, then pull open the photo tray.
Figure : Removing the output tray and pulling open the photo tray
-
Remove any paper from the photo tray.
-
Insert the photo paper print-side down into the photo tray. For photo paper with a perforated tab, place the paper in the tray print-side down with the perforated tab closest to you.
Figure : Loading the photo paper

-
Make sure the stack of photo paper is centered in the tray and is not higher than the top edges of the paper width guides.
-
Push the photo tray into the printer as far as possible.
Figure : Pushing in the photo tray
-
Place the output tray back on the input tray, if you removed it, then push the input tray into the printer until it locks into place.
Figure : Replacing the output tray and pushing in the input tray

-
On the Did You Change the Paper? screen that displays, check to make sure the photo paper is correctly loaded into the photo tray.
-
If 4x6 in., Photo Paper displays in the Photo Tray field, the photo paper is loaded correctly in the photo tray. Touch OK to return to the Home screen, or wait several seconds to allow the printer to automatically return to the Home screen.
-
If the Photo Tray field displays as Empty, open the photo tray, make sure the photo paper is pushed all the way to the rear of the tray, then push the photo tray into the printer as far as possible. Push the input tray into the printer until it locks into place, then check the touchscreen to make sure 4x6 in., Photo Paper displays in the Photo Tray field.
-
Load envelopes
Pull out the input tray, load envelopes into the printer, then close the input tray.
-
Grasp the handle on the bottom of the input tray, then pull the tray toward you to open it.
The Close Tray screen displays on the printer control panel with the message, A paper tray is open. Make sure the paper you want to use is loaded, and then close the tray to continue.
Figure : Pulling out the input tray
-
With the input tray pulled out, push in the photo tray as far as possible.
Figure : Pushing in the photo tray
-
Remove any paper from the input tray, then slide out the paper width guides as far as possible.
Figure : Sliding out the paper width guides
-
Insert the envelopes into the center of the input tray with the envelope flap on the left and facing up. If the flap is on the short end of the envelope, insert the envelope into the center of the tray with the flap away from the printer and facing up.
Figure : Example of how to load envelopes into the printer

-
Push the envelopes toward the rear of the input tray until the envelopes stop, then gently slide the paper width guides inward so they lightly rest against the edges of the envelopes. Do not push in the paper width guides so far that they bind the envelopes.
Figure : Pushing in the envelopes

-
Make sure the stack of paper is not higher than the top edges of the paper width guides.
-
Push the input tray into the printer until it locks into place.
-
The Did You Change the Paper? screen displays. If you do not touch an option, the message fades after several seconds, then the printer uses the most recent paper settings. If necessary, adjust the paper settings as needed:
-
If you did not change the envelope size or type, touch OK to return to the Home screen, or wait several seconds to allow the printer to automatically return to the Home screen.
-
If you did change the envelope size or type, touch Main Tray, touch Paper Size, then touch your paper size. If needed, touch Paper Type, then touch your paper type. Touch Done, then touch OK to return to the Home screen.
-
Load index cards
Pull out the input tray, load index cards into the printer, then close the input tray.
-
Grasp the handle on the bottom of the input tray, then pull the tray toward you to open it.
The Close Tray screen displays on the printer control panel with the message, A paper tray is open. Make sure the paper you want to use is loaded, and then close the tray to continue.
Figure : Pulling out the input tray
-
With the input tray pulled out, push in the photo tray as far as possible.
Figure : Pushing in the photo tray
-
Remove any paper from the input tray, then slide out the paper width guides as far as possible.
Figure : Sliding out the paper width guides
-
Insert a small stack of index cards into the center of the input tray. Make sure the print side is face-down with the short edge forward.
-
Push the index cards toward the rear of the input tray until the cards stop.
-
Gently slide the paper width guides inward so that they lightly rest against the edges of the cards. Do not push in the paper width guides so far that they bind the paper.
Figure : Pushing in the index cards
-
Make sure the stack of index cards is centered in the tray and is not higher than the top edges of the paper width guides.
-
Push the input tray into the printer until it locks into place.
-
The Did You Change the Paper? screen displays. If you do not touch an option, the message fades after several seconds, then the printer uses the most recent paper. If necessary, adjust the paper settings as needed.
-
If you did not change the paper size or type, touch OK to return to the Home screen, or wait several seconds to allow the printer to automatically return to the Home screen.
-
If you did change the paper size or type, touch Main Tray, touch Paper Size, then touch your paper size. Touch Paper Type, then touch your paper type. Touch Done, then touch OK to return to the Home screen.
-
davidsonpardow1961.blogspot.com
Source: https://support.hp.com/emea_middle_east-en/document/c04712708
0 Response to "Is There an Automatic Paper Feed for the Hp Envy 5540"
Post a Comment